Abdominal Strength and Endurance
This is an excerpt from FitnessGram Administration Manual 5th Edition With Web Resource by .
Strength and endurance of the abdominal muscles are important in promoting good posture and correct pelvic alignment, the latter of which is particularly important to low-back health. In testing and training the muscles of this region, it is difficult to isolate specific abdominal muscles. For example, the modified sit-up, which is used in many fitness tests, involves the hip flexor muscles in addition to the abdominal muscles. In contrast, the curl-up assessment used in FitnessGram is both safer and more effective because it does not involve the hip flexor muscles and because it minimizes compression in the spine, as compared with a full sit-up in which the feet are held. This protocol is adapted from a version reported by Massicote (1990).
Curl-Up
Recommended
The curl-up with knees flexed and feet unanchored is used because these two elements have been shown to do the following: (a) decrease movement of the fifth lumbar vertebra over the sacral vertebrae, (b) minimize activation of the hip flexors, (c) increase the activation of the external and internal obliques and transverse abdominals, and (d) maximize abdominal muscle activation of the lower and upper rectus abdominals relative to disc compression (load) as compared with a variety of sit-ups. Specific research studies related to the curl-up are discussed in the FitnessGram / ActivityGram Reference Guide (Plowman and Meredith 2013), which can be downloaded at www.cooperinstitute.org/reference-guide. The consistency and accuracy of the curl-up assessment have been addressed by only a few results. Reliability is higher for college students than for children, but the values for children are acceptable for this type of assessment. Determination of validity has been hampered by the lack of an established criterion measure. The primary support for using the curl-up test to determine abdominal strength and endurance has been provided through anatomical analysis and electromyographical documentation.
Test Objective
The objective of this test is to complete as many curl-ups as possible (up to a maximum of 75) at a specified pace.
Equipment and Facilities
This test requires a gym mat marked with the distances of the curl-up strips or a gym mat and a measuring strip for every two students. Premarked mats are available for purchase, or you can make curl-up strips from cardboard, rubber, smooth wood, or any similar material that is thin and flat and measures 30 to 35 inches (76.2 to 88.9 centimeters) in length. Two widths of measuring strip may be needed - a narrower width (3 inches, or 7.62 centimeters) for testing 5- to 9-year-olds and a wider one (4.5 inches, or 11.43 centimeters) for testing older students. You also need score sheets, either for individuals (figure 5.1, a or b) or for the class (figure 5.1c); these sheets are available in the web resource.
During the test, you will need the curl-up test cadence from the accompanying web resource and a device with which to play the cadence (e.g., laptop or other digital music player with speaker).
Test Instructions
- Allow students to partner up in groups of two. Partner A will perform the curl-up while partner B counts and watches for form errors.
- Partner A lies supine on the mat with knees bent at an angle of about 140 degrees, feet flat on the floor, legs slightly apart, arms straight and parallel to the trunk, and palms resting on the mat. The fingers are stretched out, and the head is in contact with the mat. Make sure that students extend their feet as far as possible from the buttocks while still allowing the feet to remain flat on the floor - the closer the feet are to the buttocks, the more difficult the movement.
- After partner A assumes position on the mat, partner B ensures that the fingertips rest on the nearest edge of the curl-up distance by checking the location on a premarked mat or by placing the measuring strip on the mat under partner A's legs so that partner A's fingertips are on the nearest edge of the measuring strip (figure 8.1a).
- Partner B then kneels down at partner A's head in a position to count curl-ups and watch for form breaks. Partner B places a piece of paper under partner A's head to help determine whether partner A's head touches down on each repetition (the paper crinkles each time partner A touches it with his or her head).
- Before the test begins, partner B may pull on partner A's hands to ensure that the shoulders are relaxed and in a normal resting position. If partner A is allowed to hunch the shoulders before beginning the test, he or she may be able to get the fingertips to the other side of the testing strip by merely moving the arms and shoulders up and down.
- The test begins with the feet flat on the floor but only the heels must remain in contact with the mat during the test. Partner A curls up slowly (figure 8.1b), sliding the fingers across the measuring strip until they reach the other side (figure 8.2, a and b). Partner A then curls back down until his or her head touches the piece of paper on the mat. Movement should be slow and gauged to the cadence of about 20 curl-ups per minute (1 every three seconds); the teacher either calls the cadence or uses the prerecorded cadence. The performer should not be allowed to reach forcibly with the arms and hands.
- Partner A continues without pausing until he or she can no longer continue or has completed 75 curl-ups, or until the second form correction is made.
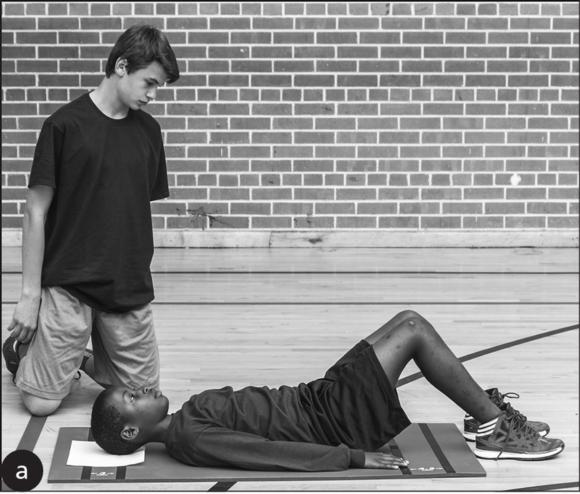
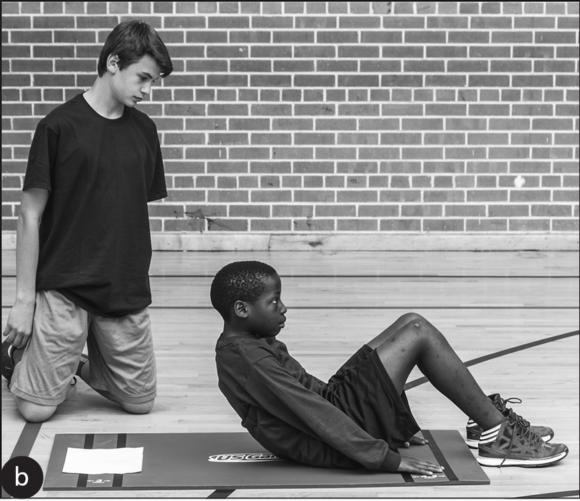
Figure 8.1 (a) Starting position for the curl-up test. (b) "Up" position in the curl-up test.
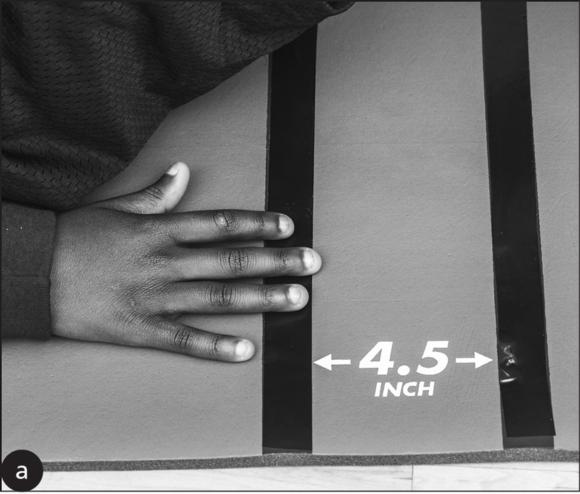
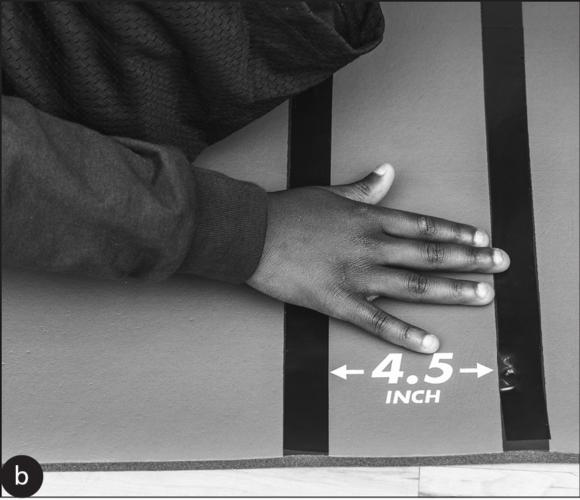
Figure 8.2 (a) Close-up of fingertips sliding in the starting position. (b) Close-up of fingertips sliding in the ending position.
Form Corrections
- The heels must remain in contact with the floor.
- The head must return to the mat on each repetition.
- Pauses and rest periods are not allowed; the movement should be continuous and in keeping with the cadence.
- The fingertips must touch the far side of the measuring strip.
Scoring
The score is the number of curl-ups performed. A curl-up should be counted when the student's head returns to the mat. For ease in administration, the first form break counts as a curl-up; the test ends on the second form break.
Suggestions for Test Administration
- The student being tested should reposition if the body moves so that the head does not contact the mat at the appropriate spot or if the measuring strip is out of position.
- Movement should start with a flattening of the lower back, followed by a slow curling of the upper spine.
- The hands should slide across the measuring strip until the fingertips reach the opposite side (either 3 or 4.5 inches), then return to the supine position. The movement is complete when the back of the head touches the paper placed on the mat.
- The cadence encourages steady, continuous movement done with correct form.
- Students should not reach forcibly with their arms and hands; nonetheless, when students first begin to perform this test item, they may want to reach, especially if they have previously done a timed sit-up test. In this test, however, they should simply let their arms move passively along the floor in response to the action of the trunk and shoulders. Any jerking, kipping, or reaching motion causes the student to move out of position.
- This curl-up protocol is quite different from that of the one-minute sit-up. Students need to learn how to correctly perform the curl-up movement and must be allowed time to practice it.
Learn more about FitnessGram Administration Manual, Fifth Edition.
More Excerpts From FitnessGram Administration Manual 5th Edition With Web ResourceSHOP

Get the latest insights with regular newsletters, plus periodic product information and special insider offers.
JOIN NOW