Suspension Training
This is an excerpt from Maximum Interval Training by John Cissik,Jay Dawes.
Getting Started
Suspension training involves a little more in terms of setup, adjustment, and basic positions than the other exercise modes covered in this book. Recognizing this requirement helps ensure a safe, successful experience. With that in mind, this part of the chapter covers how to secure and adjust the suspension trainer, the basic grips that are used, and the basic positions used in the exercises.
Securing and Adjusting
The suspension trainer needs to be secured to an object. The object that it is secured to should be able to handle your body's weight without moving or breaking. For example, a tree limb may be tall enough, but if the limb isn't big enough it will break when you try to perform a chest press or push-up. A pull-up bar or a set of monkey bars is ideal for securing a suspension trainer, but a door or small tree limb is not because it may not be able to handle the weight of your body.
Suspension trainers generally have a strap with some sort of carabiner. The carabiner is on one end of the strap, and the rest of the suspension trainer is attached to the other end. The carabiner and strap are looped around the object that the trainer is to be attached to, and the carabiner is then attached to the strap (figure 7.1).
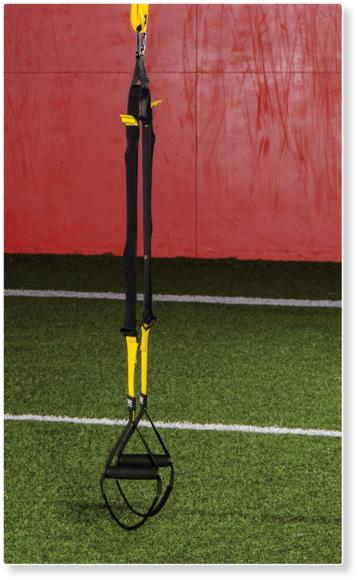
Suspension trainer with strap and carabiner.
If you want the suspension trainer to be farther off the ground, the strap can be looped around the object it is being attached to multiple times to draw up the suspension trainer. If you want the suspension trainer to be closer to the ground, the strap can be looped around the object that it is being attached to fewer times, which will result in the trainer being lower to the ground. Some exercises should have the trainer higher, some are better if the trainer is lower, and several are best when the trainer is in between. The positioning depends on the exercise and the desired difficulty level.
The handles on most suspension trainers also adjust up or down. Generally, this is done with a buckle that unlocks the strap attached to the handle. After the buckle is released, the handle can be adjusted upward or downward (figure 7.2). This mechanism provides another way to make the trainer closer to the ground or farther from it.
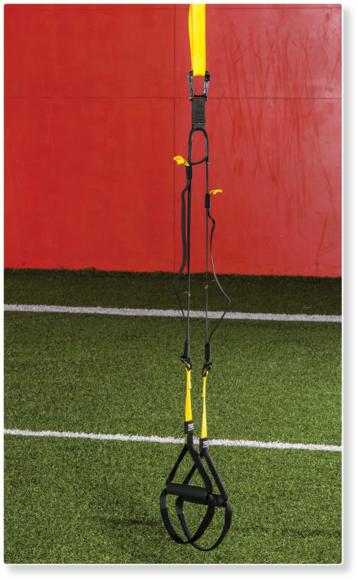
Suspension trainer with adjustable handle.
Grips
Four basic grip types are used for suspension trainer exercises. For each grip, the thumb and fingers should be wrapped around the handles. The first grip type is the prone grip, sometimes referred to as an overhand grip (figure 7.3). For the prone grip, the palm faces away from the body or down. So a push-up or a chest press is an example of a prone grip. The second grip type is the supine grip, sometimes called an underhand grip (figure 7.4). For the supine grip, the palms face up or toward the body. An example of this is a biceps curl. The third grip type is the neutral grip (figure 7.5), in which the palms face in toward the body (and toward each other).
The fourth grip type is used for one-handed exercises. A one-handed exercise may use a supine, prone, or neutral grip. The big difference here is that the suspension trainer has to be set up to perform a one-handed exercise. To perform a one-handed exercise, one of the handles is drawn through the other handle (see figure 7.6). After the handle is drawn through, it is used to perform the exercises.
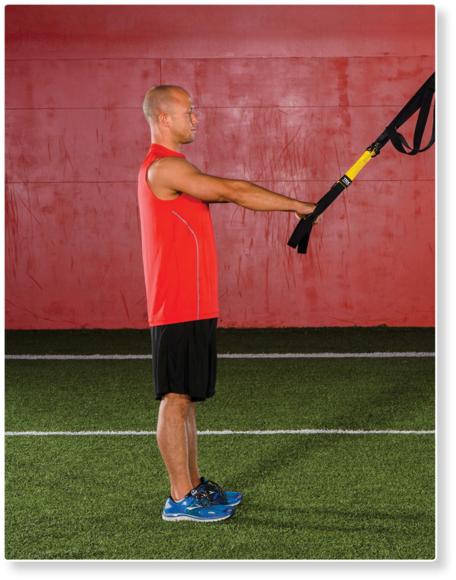
Prone grip (overhand).
Supine grip (underhand).
Foundational Exercises
Every exercise listed in this section should be a mainstay of a maximum interval-training program using the suspension trainer, regardless of your fitness level and experience. Besides their value in enhancing fitness, these exercises have a number of purposes. First, they teach positions, grips, and fundamental movement patterns. Second, they develop your balance and knowledge of your body in space. Finally, they develop many of the stabilizing muscles that support exercise with suspension trainers.
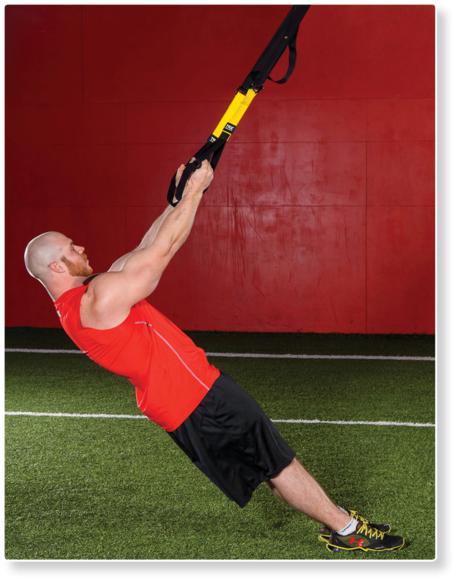
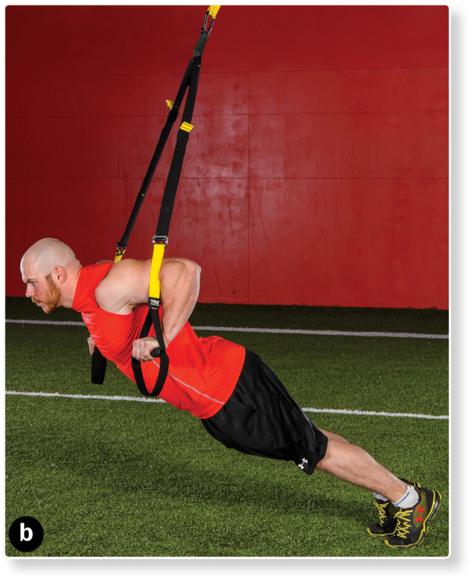
Suspension Chest Press
Intended Uses
The chest press develops the muscles of the chest, shoulders, and triceps. The core helps to stabilize the body during this exercise, so it is trained as well. This exercise is rhythmic in nature and can be used for conditioning.
Prerequisites
- Ability to adjust the straps to the appropriate position.
- Ability to perform exercise from the prone standing position.
Steps
- Grip the handles with a prone grip.
- Assume the prone standing position (a).
- From that position, lower yourself toward the handles by flexing your elbows and allowing the handles to move away from each other (b).
- From the bottom position, reverse direction until your arms are extended.
- Repeat for the desired number of repetitions.
Key Points
- Maintain a straight line from the heels to the shoulders during this exercise.
- The handles begin the exercise close together, and they move apart as you lower the body toward them.
- During this exercise, you lower the body toward the handles and then push it away from them.

Learn more about Maximum Interval Training.
More Excerpts From Maximum Interval TrainingSHOP

Get the latest insights with regular newsletters, plus periodic product information and special insider offers.
JOIN NOW