Applying and removing casts and splints
This is an excerpt from Athletic Taping, Bracing, and Casting, 4th Edition With HKPropel Access by David H Perrin,Ian A McLeod.
This section details the fundamental steps and important considerations that pertain to applying and removing fiberglass casts and splints.
Application of a Fiberglass Cast
- Based upon history, physical exam, and imaging studies, determine what type of cast should be applied.
- Inspect the involved extremity and document the presence or absence of skin lesions, open wounds, and swelling.
- Presence of an open wound in an area that will be covered by the cast is a contraindication to applying the cast.
- If post-traumatic swelling is still present and the injury occurred less than 48 hours ago, it is contraindicated to apply a cast. If the injury occurred more than 48 hours ago, swelling is gradually decreasing, and the patient is capable of elevating the involved extremity, a cast can be applied. Manifestations of compartment syndrome must be reviewed.
- Check and document distal neurovascular status for the involved and uninvolved extremity.
- Cover the patient's clothing with a protective barrier.
- To determine the amount of stockinette needed, measure about 4 inches (10 cm) beyond each end of the area that will be casted.
- Apply stockinette and place each joint that will be immobilized in a functional position. Specific positions are as follows:
- Elbow: 90º of flexion (see figure 6.13a)
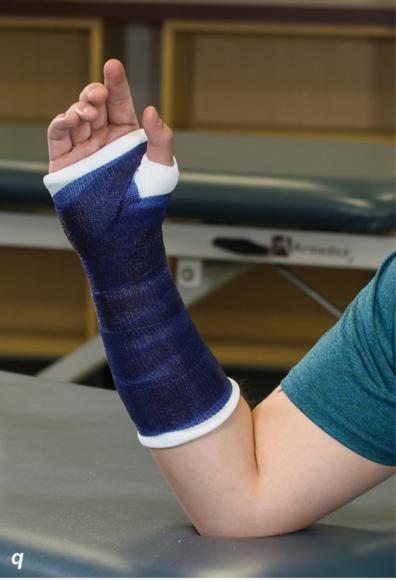
- Wrist: 30º of extension (see figure 7.22a)
- Thumb: midway between maximal radial and palmar abduction (see figure 7.22a)
- Hand: metacarpophalangeal joints in 70º of flexion and interphalangeal joints in full extension (see figure 7.19a)
- Knee: 15º to 30º of flexion
- Ankle: 0º of dorsiflexion (see figure 2.33a)
- Smooth out any wrinkles in the stockinette. If needed, trim the stockinette over flexor surfaces.
- Apply cast padding by beginning about 1 inch (2-3 cm) beyond the distal end of the area that will be casted. Roll the cast padding circumferentially from distal to proximal, making sure to overlap the previous layer by 50%. This will provide two layers of padding. Ideally you should have two to three layers of padding. The cast padding should extend about 1 inch (2-3 cm) beyond the proximal end of the area that will be casted (see figure 2.33e).
- Extra padding can be applied to protect bony prominences (e.g., ulnar styloid, olecranon process, medial malleoli, and lateral malleoli).
- Place extra padding at the proximal and distal edges of the area that will be casted.
- Too much padding on the flexor surface of a joint will increase the risk of skin irritation and skin breakdown.
- Excessive padding can compromise the ability of the cast to immobilize the injured area.
- Apply fiberglass casting material by beginning about 1 inch (2-3 cm) in from the distal end of the cast padding. The fiberglass material should be rolled circumferentially from distal to proximal, overlapping the previous layer by 50%. Maintaining a small amount of uniform tension will reduce the risk of skin irritation, neurological injury, and vascular compromise (see figure 2.33h).
- After applying two to three layers of fiberglass, confirm that functional positioning of the joints has been maintained. Using the palm and heel of the hand, mold the casting material as needed. Never use the fingertips when molding because they may create focal pressure points that increase the risk of skin irritation and pressure sores.
- Prior to applying the final layer of fiberglass, fold the stockinette back over the previously applied fiberglass. The final layer of fiberglass should be applied in a distal to proximal direction. If necessary, mold the final layers of casting material.
- Following cast application. recheck and document distal neurovascular status for the involved and uninvolved extremity.
Video 1.1 demonstrates the preparation and application of a fiberglass cast.
Cast removal is best accomplished with use of a cast saw (see figure 1.23a) because it has an oscillating blade that is specially designed to cut hardened fiberglass and plaster. While the oscillating blade can damage the underlying soft tissue, the risk of injury is significantly less in comparison to that of a rotating saw blade. As the oscillating blade cuts the hard cast material, a significant amount of heat is generated, which has the potential to burn the patient. Inserting a plastic cutting guard between the stockinette and skin and using proper cutting technique reduces the risk of soft-tissue injury. When cutting the fiberglass it is best to use the "up, over, and down" technique described here:
- While holding the saw blade perpendicular to the cast (see figure 1.24a), apply gentle downward pressure until there is a sudden decrease in resistance, which indicates that the saw blade has cut through the cast.
- Lift upwards to remove the saw blade. Once the saw blade is clear of the cast, move it over to the adjacent portion of the cast.
- Once again, apply gentle downward pressure until the blade cuts through the cast.
- Repeat this technique along the entire length of the cast.
- Resist the temptation to "drag" or "push" the saw blade along the length of the cast because doing so significantly increases the risk of soft-tissue injury.
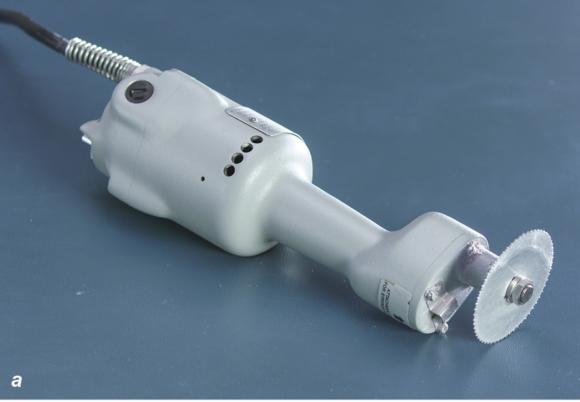
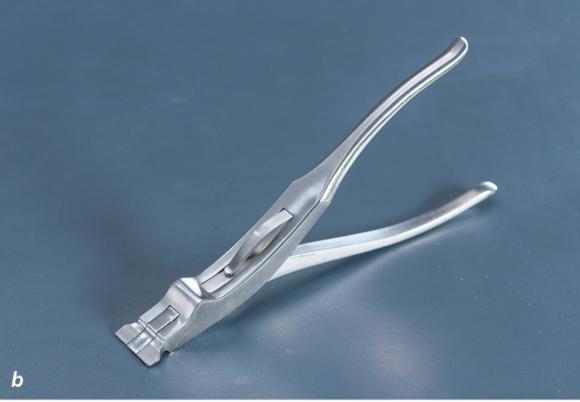
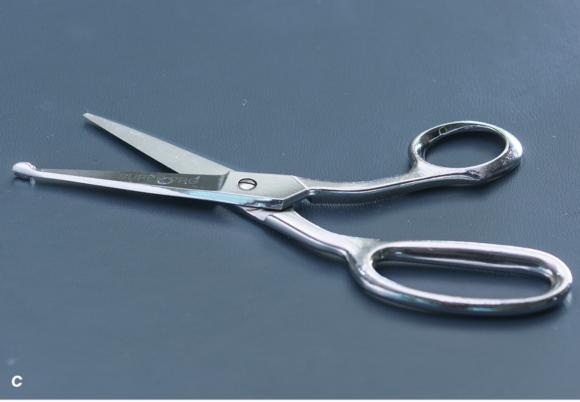
Figure 1.23 (a) Cast saw, (b) cast spreader, and (c) bandage scissors that are necessary for cast removal.
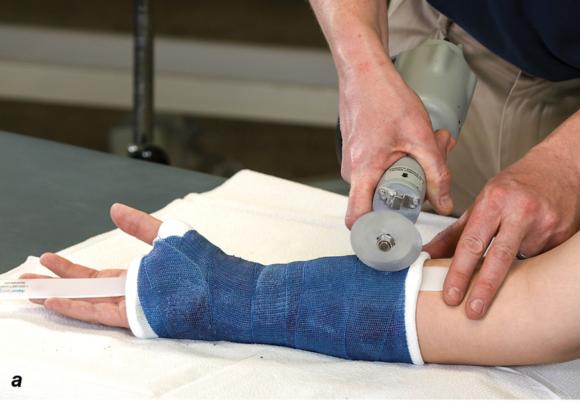
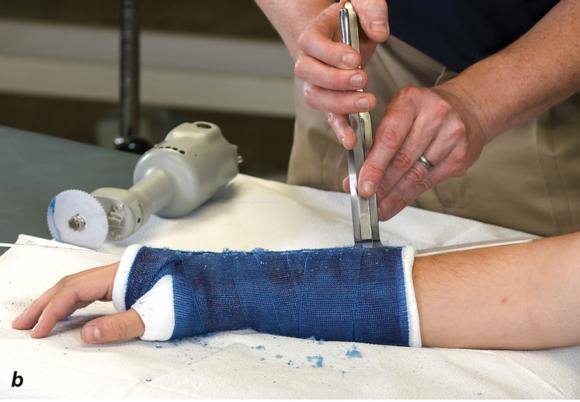
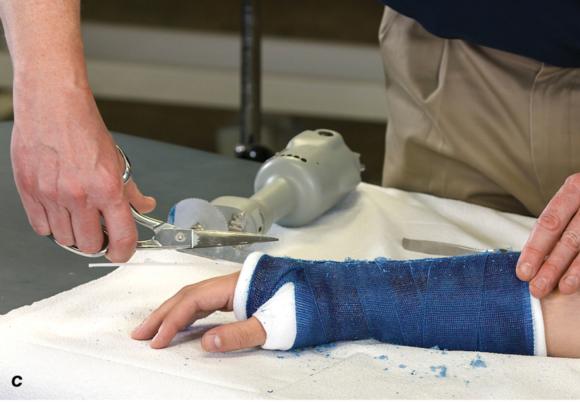
Figure 1.24 (a) Hold the cast saw blade perpendicular to the cast. (b) Cast spreaderis used to separate the opposing edges of the cast. (c) Bandage scissors are used to cut the underlying cast padding and stockinette.
Cast removal is accomplished by making a longitudinal cut along the entire length of the cast followed by a similar cut on the opposing side of the cast. Once both cuts have been completed, a cast spreader (see figures 1.23b and 1.24b) can be used to separate the opposing halves of the cast, making it much easier to use bandage scissors (see figures 1.23c and 1.24c) to cut along the length of the underlying cast padding and stockinette.
Video 1.3 demonstrates cast removal.
Splint removal is accomplished by first removing the elastic wrap that secures the splint in place. Next, the rigid splint is removed. When doing so it is extremely important to support the injured extremity to minimize any type of movement or stress that could compromise the healing that has taken place. Bandage scissors are used to cut along the entire length of the cast padding and stockinette, which is then removed.
We've included this general competency checklist to help instructors and students alike evaluate the knowledge, skills, and techniques necessary for effective injury assessment and casting or splinting.
The principles we have presented in this chapter will prepare you for the specific treatments that we discuss in the remaining chapters. Good luck as you begin your training in these gratifying psychomotor skills!
Visit the web resource for checklists and video clips related to topics discussed in this chapter.
Casting and Splinting Competency Checklist
- Determines mechanism of injury
- Ensures a clean body part that is free from open wounds
- Checks distal neurovascular status
- Selects appropriate splint or cast
- Properly positions patient and body part
- Correctly applies appropriate splinting or casting or combination procedure
- Checks distal neurovascular status
- Educates patient on signs and symptoms that would warrant removal of the splint or cast
- Correctly instructs patient on how to remove splint or how to seek assistance with removing a cast
Learn more about Athletic Taping, Bracing, and Casting, Fourth Edition.
More Excerpts From Athletic Taping, Bracing, and Casting, 4th Edition With HKPropel AccessSHOP

Get the latest insights with regular newsletters, plus periodic product information and special insider offers.
JOIN NOW
Latest Posts
- Outdoor recreation and adventure activities lead to positive health outcomes for children
- Schools offer a wide variety of adventure programs for children
- Using sport to change society
- Despite progress, equity remains a pressing challenge for women in sport
- What today’s athletes expect from coaches
- Barriers to youth participation in physical activity and sport